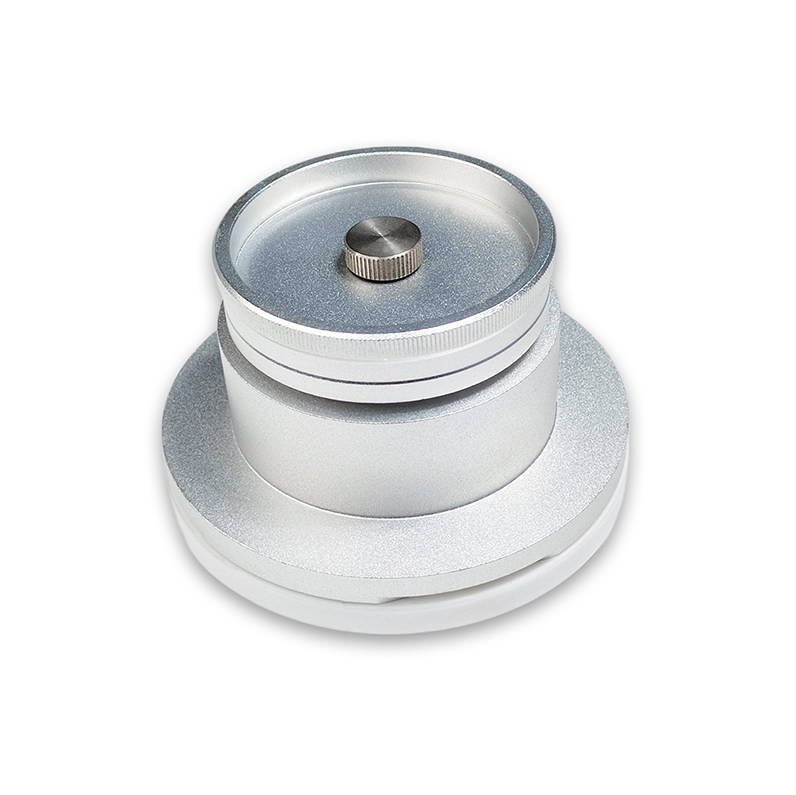
A sealed ink cup is a modern, highly efficient component in pad printing that serves as both an ink reservoir and a doctoring system. For anyone new to pad printing, understanding this ingenious device is the first step toward achieving clean, consistent, and high-quality prints. It works by holding the ink in an inverted, sealed container that presses against the printing plate (cliché). As it moves, the sharp edge of the cup’s ring scrapes the plate clean, leaving ink only in the desired etched artwork, ready for the pad to pick up. This enclosed system minimizes ink and solvent evaporation, reduces contamination, and creates a safer, cleaner working environment compared to older open inkwell methods.
Table of Contents
- What is a Sealed Ink Cup in Pad Printing?
- The Core Showdown: Sealed Ink Cup vs. Open Inkwell System
- How Does a Sealed Ink Cup Work? The Ingenious Mechanism Explained
- Anatomy of a Sealed Ink Cup: Understanding the Key Components
- A Practical Guide to Using Your Sealed Ink Cup
- Troubleshooting Common Sealed Ink Cup Problems
- The Bottom Line: Why a Sealed Ink Cup is a Smart Investment
What is a Sealed Ink Cup in Pad Printing?
In the world of pad printing, the sealed ink cup (also known as a closed cup system) is a revolutionary advancement that has largely replaced the traditional open inkwell. Think of it as a specialized, non-spill container for your printing ink. Its primary purpose is twofold: first, to act as a reservoir, holding the ink needed for the print job; and second, to act as a “doctor blade,” precisely wiping the printing plate so that ink remains only in the etched image area. This dual function is the key to its efficiency and the high-quality results it produces.
The sealed design prevents the volatile solvents in the ink from evaporating into the air. This not only saves a significant amount of money on ink and solvents but also maintains the ink’s viscosity (its thickness) for much longer. Consistent viscosity is crucial for achieving uniform print quality from the first print to the thousandth. Furthermore, because the ink is enclosed, it is protected from dust, debris, and other airborne contaminants, ensuring a cleaner printing process and reducing print defects.

The Core Showdown: Sealed Ink Cup vs. Open Inkwell System
To truly appreciate the benefits of the sealed ink cup, it’s helpful to compare it to its predecessor: the open inkwell system. The open system uses a trough (the inkwell) to hold a pool of ink and a separate, flat blade (the doctor blade) to scrape the plate. While functional, this older method has several drawbacks that the sealed ink cup was designed to overcome. For any beginner, understanding these differences makes it clear why sealed cups are now the industry standard for most applications.
The primary distinctions lie in efficiency, consistency, and safety. An open inkwell exposes a large surface area of ink to the air, leading to rapid solvent evaporation. This requires the operator to constantly monitor and adjust the ink viscosity by adding thinner, a process that can be inconsistent and time-consuming. Sealed ink cups, by contrast, can reduce solvent evaporation by up to 95%, offering superior viscosity control and a much more stable process. The table below provides a clear, at-a-glance comparison of these two systems.
| Feature | Sealed Ink Cup System | Open Inkwell System |
|---|---|---|
| Ink Exposure to Air | Minimal; ink is enclosed. | High; ink is in an open trough. |
| Solvent Evaporation | Very Low. Leads to significant cost savings. | Very High. Requires constant addition of thinner. |
| Ink Viscosity Control | Excellent. Ink remains stable for hours or days. | Poor. Requires frequent operator intervention. |
| Setup & Color Change | Fast. Simply swap the cup. | Slower. Involves cleaning the trough and doctor blade assembly. |
| Cleanup Process | Easier and less messy. Contained system. | Messy. Involves scraping and cleaning the open trough. |
| Operator Safety & Fumes | High. Vapors are contained within the cup. | Low. Exposes operator to constant solvent fumes. |
| Initial Cost | Higher. The cup and ring are precision components. | Lower. The system components are simpler. |
How Does a Sealed Ink Cup Work? The Ingenious Mechanism Explained
The operation of a sealed ink cup is a beautifully simple and effective mechanical process that occurs with every print cycle. It relies on pressure and a highly polished, sharp ring to perfectly ink the plate. Understanding this cycle is fundamental to operating your machine and troubleshooting any issues. The process can be broken down into two main strokes.
Step 1: The Forward Stroke (Inking the Cliché)
The print cycle begins with the sealed ink cup positioned behind the etched image on the cliché plate. The cup moves forward, gliding over the etched portion of the plate. As it passes over the image, the ink inside the cup flows out and fills the shallow etching. The entire image area is now flooded with ink, held in place by the body of the cup as it continues its forward movement to the front of the plate.
Step 2: The Return Stroke (Doctoring the Plate)
This is the most critical phase of the process. Once the cup reaches its forward position, it begins its return stroke. During this movement, the sharp, highly polished edge of the doctoring ring on the bottom of the cup acts like a squeegee or a razor blade. It scrapes across the surface of the cliché, shearing off all the excess ink from the non-etched areas. This action, known as “doctoring,” leaves a perfectly clean plate surface with ink remaining only within the precise confines of the etched image. The plate is now ready for the silicone pad to descend, pick up the inked image, and transfer it to the product.
The Role of Magnetism and Pressure
What ensures such a clean wipe? The answer is a combination of pressure and, in many designs, magnetism. The cup itself contains powerful magnets (or is mounted in a pressurized holder) that pull it firmly down onto the steel cliché plate. This constant, even pressure ensures that the doctoring ring maintains a perfect seal against the plate throughout its movement. This prevents any ink from seeping under the ring’s edge and guarantees that the doctoring action is crisp and complete, which is essential for a sharp, defect-free final print.
Anatomy of a Sealed Ink Cup: Understanding the Key Components
While it appears as a single unit, a sealed ink cup is an assembly of a few key parts, each with a specific and vital function. As a beginner, knowing what these parts are and what they do will demystify the system and help you with proper maintenance and care.
The Cup Body
The cup body is the main structure that acts as the ink reservoir. It is typically made from solvent-resistant plastic or hard-coated aluminum. The material choice affects its durability and cost. Aluminum cups are more robust and offer better longevity, especially in demanding industrial environments, while plastic cups can be a more economical option for lighter use. The primary function of the body is simply to hold the ink and provide a housing for the other components.
The Doctoring Ring (The Most Critical Part)
The doctoring ring is the heart of the sealed ink cup system. This is the component that makes contact with the cliché plate and performs the doctoring action. It must have a perfectly smooth, sharp, and chip-free edge to function correctly. The slightest imperfection on this ring can cause streaking, leaking, or poor-quality prints. These rings are most commonly made from two materials:
- Ceramic Rings: This is the industry standard. Ceramic is an extremely hard material, making it highly resistant to wear. A well-maintained ceramic ring can last for millions of print cycles. However, its hardness also makes it brittle. It can easily chip or crack if dropped or handled improperly.
- Steel Rings: A less common and more affordable alternative, steel rings are more durable and less prone to shattering than ceramic. However, they are not as hard and will wear down more quickly, requiring more frequent replacement. They are sometimes used for short runs or with abrasive inks.
Magnets and Pressure System
Embedded within the cup body or surrounding its outer wall are strong magnets. As mentioned earlier, these magnets are what create the downward force, pulling the cup tightly against the metal cliché plate. This magnetic force is calibrated to provide enough pressure for a clean wipe without causing excessive wear on the ring or plate. Some larger pad printing machines may use a pneumatic (air pressure) system in addition to or instead of magnets to apply controlled pressure, especially for very large ink cups.
A Practical Guide to Using Your Sealed Ink Cup
Knowing the theory is one thing, but practical application is where proficiency is built. This section provides actionable steps and best practices for choosing, setting up, and maintaining your sealed ink cup to ensure optimal performance and a long operational life.
How to Choose the Right Sealed Ink Cup for Your Job
Selecting the appropriate ink cup is not a one-size-fits-all decision. The two main factors to consider are size and material. Choosing correctly can save you ink, time, and money.
- Size: The diameter of the sealed ink cup should be larger than the longest dimension of the image you are printing, but not excessively so. A cup that is too large for a small image wastes ink, as the entire volume of the cup must be filled. More importantly, it causes unnecessary wear on a larger area of your cliché plate and the doctoring ring itself. As a rule of thumb, choose the smallest cup size that comfortably covers your artwork with a small margin.
- Material: For most applications, a standard aluminum cup with a ceramic ring is the best choice, offering a great balance of performance and longevity. If you are on a tight budget or doing very short, infrequent runs, a plastic cup with a steel ring might suffice. However, investing in a high-quality ceramic ring will almost always pay for itself in the long run through superior print quality and extended life.
Setup and Operation: A Step-by-Step Walkthrough
Proper setup is critical to preventing problems before they start. Rushing this stage often leads to frustrating issues like leaking or streaking. Follow these steps for a smooth start:
- Inspect Components: Before anything else, carefully inspect your cliché plate and your doctoring ring. Look for any scratches, nicks, or debris on the plate surface. Examine the ceramic ring under good light for any tiny chips on its sharp edge. A damaged ring is unusable and must be replaced.
- Fill the Cup: Place the cup upside down on a clean, flat surface. Pour the pre-mixed ink into the cup, typically filling it to about 75-80% capacity. Do not overfill, as this can cause spills when you invert it.
- Place the Cup on the Cliché: Carefully pick up the filled cup and, in one smooth motion, turn it over and place it onto the cliché plate, away from the etched image area. The magnets will engage and hold it in place.
- Set Machine Pressure: This is a crucial, often overlooked step. Your machine will have an adjustment for the pressure applied to the cup. You need just enough pressure to create a good seal and a clean wipe. Too much pressure will cause premature wear on the ring and plate and can even break a ceramic ring. Start with low pressure and perform a test cycle. If it streaks, increase the pressure slightly until you get a clean wipe. This is the optimal setting.
Essential Cleaning and Maintenance Procedures
Diligent cleaning is the single most important factor in extending the life of your ink cup and ensuring consistent print quality. Dried ink is the enemy of a sealed ink cup system. It can damage the ring, clog the etch, and ruin prints.
- Daily Cleaning: At the end of every shift or print run, the cup must be cleaned immediately. First, use a plastic spatula to scrape as much ink as possible back into its container. Then, use a shop towel or lint-free cloth dampened with the appropriate cleaning solvent to wipe the inside of the cup clean. Pay special attention to the doctoring ring. Never use metal tools like screwdrivers or razor blades to scrape ink off a ceramic ring—it will destroy it.
- Deep Cleaning: Periodically, you may need to perform a more thorough cleaning, especially if you notice stubborn ink residue. This can involve disassembling the cup (if your model allows) and soaking the components in an approved solvent. Always follow the manufacturer’s recommendations for deep cleaning procedures.
- Ring Care: Treat your ceramic ring like a precious, fragile tool. When it’s not in the machine, store it in the padded case it came in. When cleaning it, wipe it gently. Its smooth, polished surface does most of the work, so aggressive scrubbing is unnecessary and risky.
Troubleshooting Common Sealed Ink Cup Problems
Even with perfect setup and maintenance, you will eventually encounter issues. Knowing how to quickly diagnose and fix common problems will save you immense time and frustration. Here are solutions to the most frequent challenges.
Why is My Ink Cup Leaking?
A leaking ink cup is messy and wastes ink. It’s almost always caused by an imperfect seal between the doctoring ring and the cliché plate. Here’s what to check:
- Damaged Ring: The most common cause. Inspect the edge of your ceramic ring for any nicks or chips. Even a microscopic chip can break the seal and cause a leak. If you find one, the ring must be replaced.
- Scratched Cliché: A deep scratch on the cliché plate that runs under the path of the ring will create a channel for ink to escape. The cliché may need to be polished or replaced.
- Incorrect Pressure: Too little pressure won’t create a firm seal, allowing ink to seep out. Too much pressure can deform the ring slightly, also breaking the seal. Revisit your pressure settings.
- Debris: A small piece of dried ink or dirt trapped under the ring will lift it off the plate, causing a leak. Clean both the ring edge and the cliché surface thoroughly.
What Causes “Streaking” in the Print?
Streaking occurs when the doctoring ring fails to wipe the plate completely clean, leaving a fine line of ink on the non-etched surface that gets transferred to the final print.
- Damaged Ring: Just like with leaking, a tiny chip in the ring is a primary culprit. The chip prevents the ring from making perfect contact, leaving a trail of ink behind it.
- Dried Ink on Ring Edge: If a small bit of ink dries on the very edge of the doctoring ring, it will act like a “bump,” lifting the ring off the plate and causing a streak. Carefully clean the ring’s edge with a solvent-soaked, lint-free swab.
- Particulate in Ink: If your ink is contaminated with dust or dried ink particles, one can get lodged under the ring. Always use filtered ink and keep your ink containers closed.
How Do I Prevent My Ceramic Ring from Breaking?
A broken ceramic ring brings your production to a halt. Since they are fragile and relatively expensive, protecting them is a priority. Breakage is almost always due to operator error.
- Handle with Extreme Care: Never toss or drop a ceramic ring. Always handle it over a soft surface.
- Use Only Plastic or Wood Tools: Never use metal implements to clean or handle the ring. A plastic spatula is your best friend for scraping ink.
- Set Machine Stops Correctly: Ensure your pad printer’s mechanical stops are set so the ink cup cannot possibly run off the edge of the cliché plate or crash into another machine part. Impact is a guaranteed way to shatter a ring.
- Avoid Excessive Pressure: As discussed, too much downward force puts immense stress on the ring, making it vulnerable to cracking. Use the minimum pressure necessary for a clean wipe.
The Bottom Line: Why a Sealed Ink Cup is a Smart Investment
For any beginner stepping into the world of pad printing, mastering the sealed ink cup system is a foundational skill. While there is a learning curve, the advantages far outweigh the initial challenges. The switch from an open inkwell to a sealed cup represents a major leap forward in printing technology, offering unparalleled benefits in terms of cost, quality, and safety.
By drastically reducing ink and solvent consumption, the sealed cup provides a tangible return on investment that quickly offsets its higher initial cost. More importantly, the consistency it brings to the printing process—by maintaining stable ink viscosity and eliminating contamination—empowers operators to produce sharp, vibrant, and repeatable prints with far less effort. By understanding its components, following proper operating procedures, and learning how to troubleshoot it effectively, you will unlock the full potential of your pad printing machine and be well on your way to becoming a printing expert.
sealed ink cup, pad printing, sealed ink cup for pad printing, what is a sealed ink cup, how does a sealed ink cup work, sealed ink cup vs open inkwell, pad printing ink cup maintenance, choosing a sealed ink cup, cleaning a sealed ink cup, sealed ink cup troubleshooting, ceramic ring, doctoring ring, cliché plate, pad printing guide for beginners